Quick Answer
The single audio setting that professional streamers use and beginners almost universally skip is the audio compressor. A compressor automatically reduces the difference between your loudest and quietest moments, making your voice consistently clear and broadcast-ready. Set your threshold between -18 dB and -12 dB, use a 3:1 to 4:1 ratio, attack at 1 to 5 ms, and release at 40 to 80 ms for a clean, natural voice on any platform.
Your microphone costs $150. You spent three hours tweaking your OBS scene. Your lighting is perfect. But the moment a viewer tunes in, your audio either whispers or peaks so hard their speakers clip, and they leave.
Here is what nobody told you when you started streaming: hardware only gets you 40% of the way there. The remaining 60% lives inside a single audio processing setting that every professional broadcaster, podcast host, and Twitch Partner uses without thinking twice. That setting is the audio compressor.
Poor audio quality is the number-one reason viewers drop off within the first 90 seconds of a new stream, ahead of low frame rates, bad lighting, and even slow gameplay. This article explains exactly what audio compression is, the precise settings that work, and how to implement them today whether you use OBS, Streamlabs, or a browser-based platform like Yostream.
🎚️ What Is an Audio Compressor and Why Does It Matter for Streaming?
An audio compressor is a real-time signal processor that automatically turns down the volume when your voice exceeds a set level, then turns it back up when you go quiet. Think of it as an invisible sound engineer riding a fader on your behalf, constantly keeping your audio in a listenable range.
The misconception most beginners carry is that a good microphone solves the problem. It does not. Even a Shure SM7B, the microphone used by major podcast studios and broadcast professionals, will produce uneven audio without compression. The mic captures faithfully; the compressor makes it broadcast-consistent.
Without compression, here is what happens on a typical stream: you laugh loudly and clip at +6 dB, then your voice drops to a whisper during tense gameplay, then you shout at a play and slam the viewer's ears again. Viewers on mobile or in a public place simply close the tab.
Dynamic range is the difference in decibels (dB) between the loudest and quietest sounds in your audio. Uncompressed human voice in casual conversation typically spans 20 to 30 dB of dynamic range. For comfortable streaming, you want that range narrowed to 6 to 10 dB. That is exactly what a compressor achieves.
🔧 What Are the Correct Audio Compressor Settings for Streaming?
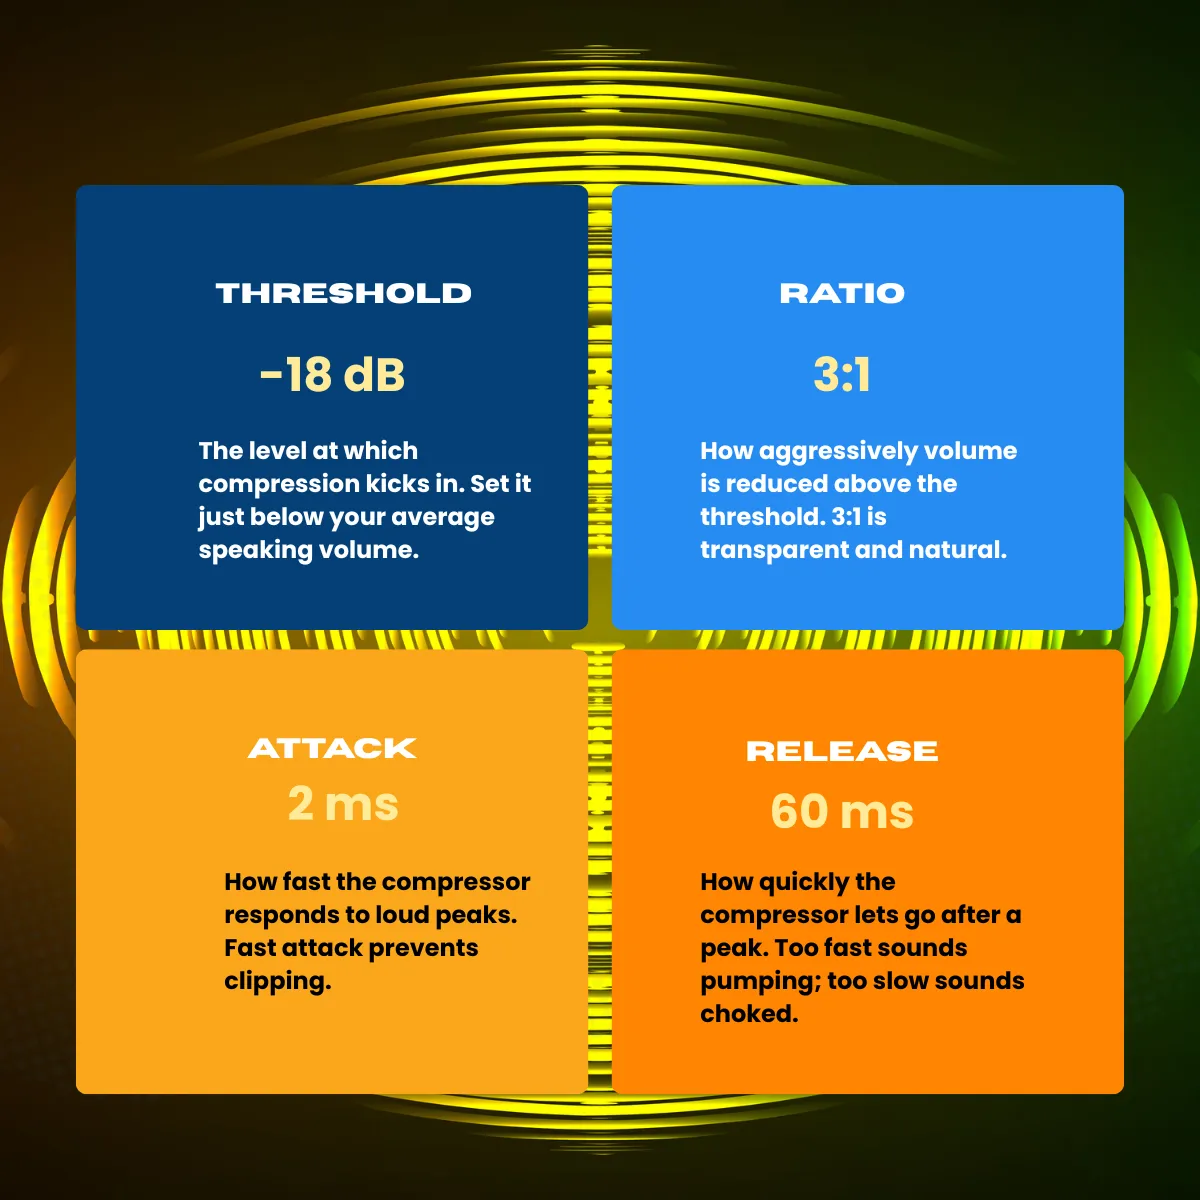
A compressor has four primary controls. Each one does a specific job. Here is what they mean and where to set them for streaming.
📊 Beginner vs. Professional Compressor Settings Compared
| Parameter | Beginner (Typical) | Professional (Recommended) | Effect of the Difference |
|---|---|---|---|
| Compressor | Off / not used | Always on | Without it, volume swings 20 to 30 dB unpredictably |
| Threshold | -30 dB (too aggressive) or 0 dB (never fires) | -18 dB to -12 dB | Correct threshold controls peaks without killing quiet speech |
| Ratio | 10:1 or 20:1 (over-compressed, robotic) | 3:1 to 4:1 | Gentle ratio preserves natural voice character |
| Attack | Default (varies by software) | 1 to 5 ms | Fast attack catches transient pops before they clip |
| Release | Default (varies) | 40 to 80 ms | Natural-sounding recovery between words |
| Makeup gain | Not set | +3 to +6 dB | Recovers perceived loudness lost during compression |
🛠️ How Do I Add a Compressor to My Stream Audio in OBS?
This is the step-by-step process for applying audio compression in OBS Studio. The same filter logic applies in Streamlabs OBS and most browser-based streaming tools.
Step 1. Open OBS and locate the Audio Mixer
In the bottom panel, find your microphone source. Every audio source you have added appears here as a channel strip with a volume meter.
Step 2. Click the gear icon on your mic channel, then select "Filters"
This opens the audio filter chain, the signal processing stack applied to your microphone in real time before it reaches your stream.
Step 3. Click the plus (+) icon and choose "Compressor"
A new compressor module appears in your filter chain. OBS includes a compressor built in with no plugins needed.
Step 4. Set Ratio to 3.00:1
This is the most important single value. Three-to-one means every 3 dB above the threshold gets reduced to 1 dB. Transparent enough to sound natural, strong enough to tame peaks.
Step 5. Set Threshold to -18.00 dB
Speak at your normal streaming volume and watch the OBS audio meter. Your average level should hit around -18 to -12 dB, the green-yellow boundary. Place the threshold just below your average level so compression fires regularly, not only on shouts.
Step 6. Set Attack to 2 ms and Release to 60 ms
These are safe starting values for voice. If you hear pumping or breathing in the audio, nudge the release up to 80 to 100 ms.
Step 7. Add 4 dB of Makeup Gain
Compression physically reduces your peak volume. Makeup gain restores the overall perceived loudness so you are not quieter than before. Set this last, after all other parameters are dialed in.
Step 8. Test by speaking normally, then laughing, then whispering
If your meter stays mostly in the -18 to -6 dB range across all three, your compressor is working correctly.
💡 Pro Tip
Add a noise gate before the compressor in your filter chain, not after. A noise gate (threshold around -32 dB) cuts background noise when you are not speaking, so the compressor never amplifies room noise or keyboard clicks. The correct filter order is: Noise Suppression, then Noise Gate, then Compressor, then Limiter.
🤔 Why Does My Stream Audio Sound Bad Even After Compression?
Compression solves dynamic range problems. But if your audio still sounds thin, distant, or muddy after applying the settings above, compression was not the only issue. Here is a quick diagnostic checklist:
- Room reflections: Hard walls create flutter echo that no compressor can fix. A moving blanket behind your desk or acoustic foam panels reduce this more than any software setting.
- Microphone placement: The SM7B, Blue Yeti, and virtually every cardioid condenser microphone need your mouth 4 to 6 inches from the capsule. Speaking from 12 inches away loses presence and adds room sound.
- Wrong polar pattern: USB microphones like the Blue Yeti have multiple polar patterns. Cardioid (the icon that looks like a heart) is correct for streaming. Omnidirectional will pick up everything in the room, including your mechanical keyboard at full volume.
- Gain staging error: If your microphone gain knob on your interface or USB mic is maxed out, you are pushing the signal into distortion before it even reaches OBS. Set hardware gain so your average speaking level peaks around -18 dBFS on your interface's meter.
- Over-compression: Using a ratio above 8:1 produces a flat, radio-announcer sound that is fatiguing over a long stream. It also makes background noise more audible during speech. Stay at 3:1 to 4:1.
⚠️Warning
A single well-provisioned SFU node can handle 500-2000 simultaneous WebRTC subscribers, depending on bitrate and server specs. Geographic distribution of SFU nodes is how you scale to tens of thousands of concurrent viewers at sub-second latency.
🔄 Does a Noise Gate Replace the Need for a Compressor?
No, and this is one of the most common misconceptions in beginner audio forums. A noise gate is a switch: it mutes audio that falls below a set level. A compressor is a dial: it proportionally reduces audio that exceeds a set level. They solve entirely different problems and work best together.
The noise gate stops your keyboard, fan, and ambient room noise from being audible when you are not talking. The compressor keeps your voice consistent in level when you are. You need both.
According to the AES (Audio Engineering Society) guidelines for broadcast voice, the recommended signal chain for a spoken-word source is: high-pass filter at 80 Hz, then de-esser, then gate, then compressor, then limiter. For streaming purposes, the de-esser is optional if your microphone is not sibilant-heavy. The gate and compressor are non-negotiable for professional results.
🎙️ Does This Apply If I Stream Directly from a Browser?
Yes, and this is where many streamers lose the benefits of good audio processing. If you stream from a browser-based tool and bypass OBS entirely, make sure your platform supports in-browser audio filters or that you process your audio at the hardware or driver level first.
Platforms like Yostream let you go live on Twitch, YouTube, Facebook, and multiple destinations simultaneously from a browser with no downloads required. For streamers who want a clean, setup-free workflow, pairing hardware-level compression (via your audio interface's built-in DSP, or a standalone hardware compressor) with Yostream's multistreaming gives you professional audio across all channels without managing a complex software chain. It is a particularly practical setup for creators who switch machines or stream from different locations.
If you use a hardware audio interface like the Focusrite Scarlett 2i2 or GoXLR Mini, both units include onboard DSP compression you can apply before the signal reaches any software. Hardware compression processes before encoding, which means it applies regardless of whether you stream through OBS, Streamlabs, or a browser-based tool.
📈 What Other Audio Settings Should I Know About?
Compression is the primary setting, but a complete professional audio chain includes three more components. Here is how they rank by impact for new streamers:
- Noise suppression (high impact for most environments): Tools like NVIDIA RTX Voice or OBS's built-in RNNoise plugin use AI to remove background noise. These work especially well in apartments and shared spaces where you cannot treat the room acoustically.
- High-pass filter (medium impact): A high-pass filter set at 80 to 100 Hz removes low-frequency rumble from your desk, HVAC system, and handling noise. It makes voice sound cleaner and less muddy without changing how you sound.
- Limiter (critical safety net): A limiter is a hard-ceiling compressor. It prevents any signal from exceeding -1 dBFS, which is just below digital maximum. Place it last in your chain. It catches anything that slips past the compressor and prevents clipping artifacts from reaching your stream.
- Bitrate for audio encoding: Stream audio at a minimum of 160 kbps AAC for stereo, or 128 kbps for mono voice-only streams. Twitch's recommended audio bitrate is 160 kbps. Audio below 96 kbps will sound noticeably low-quality on good headphones regardless of how well-compressed the source is.
Frequently Asked Questions
1. What does an audio compressor do for streaming specifically?
An audio compressor reduces the dynamic range of your microphone signal in real time, automatically turning down the volume when you get loud and letting quieter moments stay audible. For streaming, this means your voice stays at a consistent level whether you are calmly narrating, reacting with excitement, or laughing, without any manual fader adjustments. It is the difference between audio that sounds managed and audio that sounds chaotic.
2. What is the best ratio setting for a streaming compressor?
For voice streaming, a ratio between 3:1 and 4:1 is the professional standard. A 3:1 ratio means that for every 3 dB your voice exceeds the threshold, only 1 dB gets through, which is gentle enough to sound natural. Ratios above 6:1 start to sound robotic and over-processed. Ratios below 2:1 have minimal effect. Start at 3:1 and only increase if loud peaks are still breaking through.
3. Do I need a hardware compressor or does software work just as well?
For streaming, software compression in OBS or Streamlabs is functionally equivalent to a hardware compressor for most creators. Hardware units like the DBX 286s add analog warmth and process the signal before it enters your computer, which is useful if you stream from a browser without OBS. For 95% of streamers, the OBS built-in compressor set correctly sounds indistinguishable from a hardware unit on the final stream.
4. Why does my voice sound squashed or robotic after adding a compressor?
A squashed, robotic sound usually means one of three things: your ratio is too high (above 8:1), your threshold is set too low causing the compressor to fire constantly even on quiet speech, or your attack time is too fast and is sucking away the natural transients of consonants. Start by setting the ratio back to 3:1 and raising the threshold until the compressor only fires on your louder moments, not continuously.
5. Should I use compression if I have an audio interface with a built-in compressor?
Yes, and you can use both. Apply gentle hardware compression on your interface at a low ratio and conservative threshold to tame extreme peaks before the signal enters your computer, then apply a second, lighter software compression in OBS for broadcast-ready consistency. This two-stage approach, sometimes called serial compression, is standard practice in radio and podcast production. Just do not apply heavy compression at both stages or the result will sound over-processed.
6. How do I know if my audio compressor is working correctly in OBS?
Watch the OBS audio meter while speaking at different volumes. Without compression, the meter will jump significantly between a whisper and a shout. With compression correctly applied, the meter should stay relatively stable, mostly in the -18 to -6 dB zone regardless of how loud or soft you speak. Some streamers also use OBS's audio monitoring feature to hear their compressed output in real time through headphones before going live.
7. Does compression matter if I multistream to multiple platforms?
Yes, even more so. Different platforms apply different audio encoding at their end. Twitch uses AAC at 160 kbps, YouTube Live at 128 kbps stereo. Inconsistent raw audio gets more damaged by encoding compression artifacts at low bitrates. Well-compressed, consistent source audio encodes more efficiently and sounds better across all destinations simultaneously. If you multistream using a tool like Yostream, processing your audio correctly before the signal leaves your machine ensures quality across every platform in one broadcast.
Keep Reading:
- Perfect harmony: Fix Audio-Video Sync Issues During A Live Stream
- Know it today: Why Audio Sounds Different on Speakers vs. Headphones
- A step-by-step guide: The Best Audio Settings for a Crisp, Professional Podcast
- Explore it today: How to Fix Audio Delay in a Dual PC Streaming Setup