
If viewers are telling you your YouTube stream looks blurry, pixelated, or blocky (especially during fast movement), you are not imagining it. And it almost certainly is not a YouTube bug. It is a settings problem that has a real, fixable root cause.
The blurriness you see on a YouTube live stream is a side effect of video compression. Your encoder compresses the raw footage, sends it over the internet, and then YouTube re-encodes it again before serving it to viewers. Every compression step discards some visual information. When your settings are off, that discarded information is visible on screen.
This guide works through every layer of that chain, from your capture settings to YouTube's own pipeline, so you can find the exact point where quality is being lost and fix it.
How Do You Diagnose a Blurry YouTube Stream in 60 Seconds?
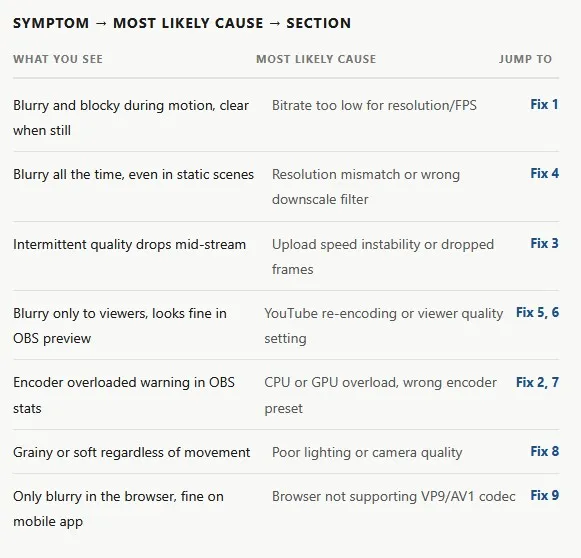
Before you change any setting, identify which type of blur you are dealing with. Different symptoms point to different root causes.
💡 Tip
Open OBS, go to View → Stats. Watch "Dropped Frames (Network)" and "Skipped Frames (Rendering/Encoding)" in real time during a test stream. Any number above 0.5% is a problem. This tells you whether the issue is on your end or YouTube's.
Fix 1: What Bitrate Should You Use for a Clear YouTube Live Stream at 1080p?
Bitrate is the single biggest lever you have over stream quality. It controls how much data your encoder sends to YouTube per second. Too little data, and the encoder is forced to discard detail, which shows up as blocks, smearing, and blur, especially during fast motion.
The reason motion makes it worse: a static scene has very little change between frames, so it compresses efficiently. A fast-moving game or sports scene requires enormous amounts of data per frame. At low bitrate, the encoder simply guesses, and the result looks like smeared paint.
YouTube's recommended bitrate ranges for live streaming
| Resolution | Frame Rate | Codec | Min Bitrate | Recommended | For fast motion (gaming/sports) |
|---|---|---|---|---|---|
| 720p | 30fps | H.264 | 2,500 Kbps | 4,000 Kbps | 5,000 Kbps |
| 720p | 60fps | H.264 | 3,500 Kbps | 5,000 Kbps | 6,500 Kbps |
| 1080p | 30fps | H.264 | 4,500 Kbps | 6,000 Kbps | 8,000 Kbps |
| 1080p | 60fps | H.264 | 6,000 Kbps | 8,000 Kbps | 10,000 Kbps |
| 1440p | 60fps | H.264 | 9,000 Kbps | 13,000 Kbps | 16,000 Kbps |
| 2160p (4K) | 30fps | H.264 | 13,000 Kbps | 20,000 Kbps | 30,000 Kbps |
| 2160p (4K) | 60fps | H.264 | 20,000 Kbps | 30,000–50,000 Kbps | 50,000 Kbps |
⚠️ Warning
Streaming 1080p60 at 6,000 Kbps is one of the most common mistakes. That number is fine for a talking-head podcast. For gaming with fast movement, you will see visible blocking. Push it to at least 8,000–10,000 Kbps if your upload allows.
How to change bitrate in OBS Studio
- Open OBS → Settings → Output
- Set Output Mode to Advanced
- Under the Streaming tab, find Bitrate
- Enter your target value in Kbps. Start at 8,000 for 1080p60
- Set Rate Control to CBR (Constant Bitrate) for live streaming. Do not use VBR, which can cause buffering spikes
- Run a test stream to a private/unlisted event and watch the Stats panel for dropped frames
💡 Pro Tip
Your bitrate should never exceed 75–80% of your actual upload speed. If your upload is 20 Mbps, cap your stream bitrate at 15,000–16,000 Kbps to leave headroom for system overhead, voice chat, and other background traffic. Run a test at fast.com or speedtest.net before every stream.
What about streaming software other than OBS?
Browser-based tools like Yostream automatically calibrate bitrate based on the resolution you select and your detected connection speed, which removes most of the guesswork for streamers who do not want to dig into manual settings. If you find OBS's manual controls frustrating, a dedicated streaming platform can handle this logic for you while still giving advanced users override options.
Fix 2: Which Encoder Should You Use for the Clearest YouTube Stream?
The encoder is the piece of software (or hardware) that compresses your raw video into a format that can be sent over the internet. The choice of encoder and its preset has a major impact on quality at any given bitrate.
| Encoder | Hardware required | Quality (same bitrate) | CPU impact | Best for YouTube? |
|---|---|---|---|---|
| x264 (software) | Any CPU | Good with slow/medium preset | High | Yes, if your CPU can handle it |
| NVENC H.264 | NVIDIA GPU | Very good (RTX 30/40 series) | Minimal | Yes. Recommended default |
| NVENC HEVC (H.265) | NVIDIA GTX 950+ | Excellent | Minimal | Yes. Better than H.264 for YouTube |
| NVENC AV1 | NVIDIA RTX 40 series | Best-in-class | Minimal | Yes. YouTube Live supports it |
| AMD AMF H.264 | AMD GPU (RX 400+) | Acceptable | Minimal | Usable, falls behind NVENC in quality |
| Intel Quick Sync | Intel integrated GPU | Good | Low | Good backup for lower-end systems |
💡 Pro tip: HEVC and AV1 on YouTube
YouTube Live accepts HEVC (H.265) over RTMP/RTMPS and supports AV1. These newer codecs achieve the same visual quality at roughly half the bitrate of H.264. If you have an NVIDIA RTX GPU, switching from NVENC H.264 to NVENC HEVC in OBS is free quality at zero cost. To enable it: OBS → Settings → Output → Streaming tab → Encoder → "NVIDIA NVENC HEVC."
What OBS encoder preset should you use?
Each encoder has presets that trade encoding speed for quality. Faster presets need less processing power but produce lower quality at the same bitrate. Slower presets produce better quality but need more CPU/GPU headroom.
| Encoder | Recommended preset | Notes |
|---|---|---|
| x264 |
veryfast
or
fast
|
Use medium only if CPU usage stays below 80% while gaming |
| NVENC H.264 / HEVC | P5: Slow (Quality) | If you see encoding lag, drop to P4: Medium |
| NVENC AV1 | P5 or P6 | RTX 4000 series only; use P5 to start |
| AMD AMF | Quality | If AMD quality falls short, switch to x264 on a fast preset instead |
| Intel Quick Sync | Quality | Performance and compatibility are solid for casual streams |
💡 Tip: Keyframe interval
Set your keyframe interval to 2 seconds in OBS (Settings → Output → Keyframe Interval). YouTube Live requires a maximum of 4 seconds. At 2 seconds, error recovery is faster, which means viewers see fewer mid-stream quality drops during brief network fluctuations.
Fix 3: How Does Unstable Internet Cause a Blurry YouTube Stream, and How Do You Fix It?
Even with perfect encoder settings, an unstable upload connection causes dropped frames. When OBS drops frames to keep up with bandwidth constraints, YouTube receives incomplete data, and the stream quality degrades or freezes. Viewers see this as stuttering or sudden drops to low resolution.
Required upload speed by resolution
| Target bitrate | Minimum upload speed needed | Recommended (with headroom) |
|---|---|---|
| 4,000 Kbps (720p30) | 5 Mbps | 8 Mbps |
| 6,000 Kbps (1080p30) | 7.5 Mbps | 12 Mbps |
| 8,000 Kbps (1080p60) | 10 Mbps | 15 Mbps |
| 15,000 Kbps (1440p60) | 18.75 Mbps | 25 Mbps |
| 30,000 Kbps (4K60) | 37.5 Mbps | 50 Mbps |
Steps to stabilize your upload connection for streaming
- Switch from Wi-Fi to a wired Ethernet connection. Wi-Fi packet loss is the most underappreciated cause of stream quality problems, particularly during gaming where both your PC and router are under load.
- Run a speed test at fast.com before going live. Your upload speed should be at least 1.5x your target bitrate (ideally 2x).
- Close all bandwidth-competing applications: cloud backup services (Dropbox, OneDrive), video calls, software update downloads, and browser tabs streaming video.
- In OBS, enable Dynamic Bitrate (Settings → Advanced → Network → "Dynamically change bitrate to manage congestion"). This reduces bitrate during instability rather than dropping frames, resulting in a slightly lower-quality but uninterrupted stream.
- If you are behind a router shared with multiple users, use QoS (Quality of Service) settings on your router to prioritize traffic from your streaming PC.
- Use RTMPS instead of RTMP when connecting to YouTube. It is YouTube's preferred protocol and slightly more resilient to interference.
📌 NOTE
Set your keyframe interval to 2 seconds in OBS (Settings → Output → Keyframe Interval). YouTube Live requires a maximum of 4 seconds. At 2 seconds, error recovery is faster, which means viewers see fewer mid-stream quality drops during brief network fluctuations.
Fix 4: Is Your Blurry Stream Caused by a Resolution Mismatch in OBS?
A very common but easy-to-miss setting issue: OBS has two resolution fields:
- Base (Canvas) Resolution
- Output (Scaled) Resolution.
If your canvas is 1920×1080 but your output is scaled to 1280×720, everything you stream is 720p regardless of what your sources are. Viewers and OBS will show "1080p" in some menus but the actual content quality is 720p.
How to check and fix your resolution settings in OBS
- Go to Settings → Video
- Set Base (Canvas) Resolution to your monitor's native resolution, typically 1920×1080
- Set Output (Scaled) Resolution to the resolution you want to stream. Match it to the Base if you want to stream at 1080p
- Set Downscale Filter to Lanczos (Sharpened scaling, 36 samples). This is the sharpest downscaling option and makes a visible difference in text legibility and fine detail
- Click OK and restart OBS
Fix 5: Does YouTube's Re-Encoding Make Streams Look Blurry? Can You Fix It?
Yes. This is a structural issue that every YouTube streamer faces. YouTube does not serve your stream directly to viewers. It receives your RTMP signal, decodes it, re-encodes it using its own parameters, and serves multiple quality tiers (1080p, 720p, 480p, etc.) to different viewers based on their connection speed.
This second compression pass always loses some quality. You cannot skip it. But you can reduce how much quality it strips by giving YouTube better source material to work with.
How to minimize quality loss from YouTube's re-encoding pipeline
- Send a higher-than-needed bitrate. The more data you send, the more detail YouTube's encoder has to work from. If your connection allows it, push above the minimum recommendations.
- Use HEVC or AV1 instead of H.264. These codecs are more efficient, so the same visual detail can be encoded at a lower bitrate, meaning YouTube receives richer source data relative to the bandwidth consumed.
- Stream at a higher resolution. A counterintuitive but validated finding among creators: uploading at 4K (even if your content is 1080p) sometimes triggers YouTube to serve it using a better codec (VP9 rather than its default for lower resolutions), resulting in noticeably cleaner 1080p playback for your viewers.
- Avoid "Ultra Low Latency" mode. YouTube's ultra-low latency setting prioritizes speed over quality and limits the encoding options available. Use "Low Latency" or "Normal Latency" for better output quality.
- Reduce visual complexity. Very detailed backgrounds, heavy particle effects in games, or rapidly changing scenes force the encoder to work harder. If you are finding quality unacceptable even with high bitrate, simplifying the visual content (a solid background, lower game graphical presets) genuinely helps.
ℹ️ How YouTube's codec selection works
YouTube uses VP9 for most 1080p and above content in Chrome and on Android. Older browsers and some smart TVs fall back to H.264 AVC, which produces more compression artifacts at the same resolution. AV1 is gradually rolling out for eligible content. Viewers on older devices may always see slightly lower quality regardless of your encoder settings. This is a YouTube-side limitation.
Fix 6: Is the Blurry Stream Actually a Viewer-Side Quality Setting Problem?
This is often overlooked, especially when you are troubleshooting based on a viewer complaint. YouTube defaults to automatic quality selection, which adapts to the viewer's connection speed. On a slow connection, a viewer will see 480p or lower regardless of how well your stream is configured.
What to tell viewers to do
- Click the gear icon (⚙️) in the YouTube player
- Select Quality
- Choose 1080p (or the highest available) manually instead of "Auto"
- On mobile: tap the three dots → Quality → select highest option. Or go to YouTube Settings → Video Quality Preferences → set to "Higher picture quality" for Wi-Fi
Note that YouTube typically takes 10–20 minutes after a live stream begins before the highest-quality transcode (1080p or above) is fully available to viewers. The first few minutes of any stream may be served at lower quality even if all your settings are correct.
Fix 7: Can Hardware Limitations or CPU Overload Cause a Blurry YouTube Stream?
Yes. This is the one case where the problem is visible in your OBS preview as well as the stream. When your CPU or GPU is overloaded, it cannot encode frames fast enough. OBS will show an "Encoding Overloaded!" warning in the Stats panel. The encoder skips frames or reduces quality to keep up, and the result is visible stuttering and blur. That's why you need to fix high CPU usage while live streaming on YouTube.
Minimum PC specs for 1080p60 streaming
| Component | Minimum (x264 software encoding) | Recommended (NVENC hardware encoding) |
|---|---|---|
| CPU | 6-core (e.g. Ryzen 5 5600, Intel i5-12400) | Any modern 4-core+; CPU freed up by NVENC |
| GPU | Any mid-range (GPU not used by x264) | NVIDIA GTX 1650+ (RTX 3060+ for best quality) |
| RAM | 16 GB | 16–32 GB for gaming + streaming simultaneously |
| Storage | SSD (for capture scratch and asset loading) | NVMe SSD |
What to do if your hardware is the bottleneck
- Switch to hardware encoding (NVENC, AMF, or Quick Sync) if you are currently using x264. This is the single biggest quality-per-CPU-cost improvement available.
- Reduce your game's in-game graphical settings to free up GPU resources for encoding.
- Lower your stream resolution to 720p60 instead of 1080p60. A smooth, clear 720p60 stream almost always looks better than a stuttering, artifact-laden 1080p stream.
- Close background applications. Even applications that appear idle (Discord video, browser tabs with video, antivirus real-time scanning) consume encoding resources.
- If budget allows, a capture card (Elgato, AVerMedia) plus a dedicated streaming PC splits the encoding load entirely off your gaming machine.
Fix 8: Can Poor Lighting or Camera Quality Cause a Blurry YouTube Stream?
If you are streaming a webcam feed (face cam, IRL stream, interview format), lighting and optics are often responsible for blur, not your streaming settings.
Here is why: dark, noisy footage is much harder for a video encoder to compress cleanly. Noise in low-light footage changes on every pixel in every frame, which forces the encoder to treat the noise as motion. This exhausts bitrate and results in a muddy, blurry output even at high bitrate.
Quick lighting fixes that improve stream quality without changing any settings
- Place your primary light source in front of your face, not behind or to the side. Backlit faces create dark face cam feeds that encode badly.
- Use a ring light or a softbox. These are the cheapest quality improvements a face-cam streamer can make.
- Increase your camera's exposure settings if your software allows (OBS camera filters → Gain). Do not push gain so high that it introduces new noise.
- Use a lens cap cleaning cloth on your webcam lens. Dust and smudging on the lens cause persistent softness that no bitrate can fix.
- If your webcam caps at 720p or 30fps, it will always be the quality ceiling regardless of your stream settings. 1080p60 webcams (Logitech C920s, Razer Kiyo Pro, Elgato Facecam) produce dramatically cleaner feeds.
💡 PRO TIP
If you use a DSLR or mirrorless camera as a webcam via capture card, keep the shutter speed at twice your frame rate (1/60s for 30fps, 1/120s for 60fps) and use a lens with a wide aperture (f/1.8 or f/2.8) in a well-lit room. This combination produces the cleanest possible source footage for your encoder.
Fix 9: Does Your Browser or Device Affect How Sharp the YouTube Stream Looks?
Yes. YouTube delivers different codecs depending on what the viewer's browser or device supports. A viewer on Chrome on a modern PC may receive VP9 or AV1-encoded video, which looks significantly better than the H.264 version served to a viewer on Safari or an older smart TV.
| Browser / Device | Codec typically used by YouTube | Relative quality at same resolution |
|---|---|---|
| Chrome (PC/Android) | VP9 / AV1 | Best |
| Firefox | VP9 | Excellent |
| Safari (macOS/iOS) | H.264 AVC (older) / VP9 (newer) | Good to excellent |
| Edge (Chromium) | VP9 / AV1 | Best |
| Smart TVs (older) | H.264 AVC | Acceptable |
| Game consoles | H.264 AVC or VP9 depending on model | Varies |
If you or a viewer is seeing poor quality in a specific browser, try Chrome as a baseline. If Chrome shows higher quality than the original browser, the codec support gap is the explanation.
Frequently Asked Questions About Blurry YouTube Streams
1. Why does my YouTube stream look blurry when I move but clear when I am still?
This is the classic symptom of a bitrate that is too low for the content's motion complexity. Static scenes compress efficiently; moving scenes need far more data per frame. Increase your bitrate (see Fix 1) and, if possible, switch to a more efficient codec like HEVC or AV1.
2. My 1080p YouTube stream still looks blurry. Why?
Setting the resolution to 1080p does not guarantee 1080p quality. Three things must all be correct: your output resolution in OBS must be 1920×1080, your bitrate must be sufficient for the content (8,000–10,000 Kbps minimum for motion-heavy 1080p60), and YouTube must have finished generating the 1080p transcode (give it 10–15 minutes after the stream begins). Also verify your downscale filter is set to Lanczos.
3. Is 6,000 Kbps enough for a 1080p YouTube stream?
6,000 Kbps is the absolute minimum for 1080p30. For 1080p60, especially with fast-moving gaming content, it will produce visible blocking during motion. 8,000 Kbps is a more realistic minimum for gaming; 10,000 Kbps is more comfortable. If your upload speed does not support this, consider streaming at 720p60 instead. A clean 720p stream is better than a blurry 1080p one.
4. Should I use CBR or VBR for YouTube live streaming?
Use CBR (Constant Bitrate) for live streaming. VBR can produce bitrate spikes that overwhelm your upload bandwidth, causing dropped frames and quality drops. CBR maintains a consistent data rate that your connection can reliably sustain. VBR 2-pass is excellent for pre-recorded video uploads, but it does not apply to live streams.
5. Does streaming in 4K improve quality at 1080p resolution for viewers?
Sometimes, yes. YouTube applies better compression algorithms (including VP9) to content ingested at 4K resolution. Creators with 4K-capable setups have reported that streaming at 4K and letting YouTube downscale to 1080p produces cleaner 1080p output than streaming natively at 1080p. The tradeoff is significantly higher bandwidth and encoding hardware requirements.
6. How long does YouTube take to process 1080p for a live stream?
YouTube Live typically makes 1080p available within 10–20 minutes after the stream starts. Before that, viewers may only see 720p or lower. If you want viewers to start at the highest quality, do a short countdown or pre-stream setup screen and then formally begin after 15 minutes have elapsed.
7. What is the best free streaming software for a high-quality YouTube stream?
OBS Studio is the standard free option and supports every encoder discussed in this guide. Streamlabs (built on OBS) adds a UI layer. For creators who want a browser-based option without software installation (particularly useful for streaming from multiple scenes, using virtual cameras, or doing multi-guest productions). Browser-native platforms like Yostream are worth evaluating, as they handle encoding optimization at the platform level and are accessible without downloading software.
Pre-Stream Quality Checklist
Run through this before every stream. Most blurry-stream complaints trace back to one of these items being misconfigured or forgotten after a system update.

You'll Want to See This:
- Go live. Not crazy: Audio Out of Sync on YouTube Live? Here's How to Fix It Fast
- Avoid the delay: Prevent Buffering And Lag During Live Streams
- Enjoy dual streaming on YouTube: Stream Horizontal And Vertical Videos Together On YouTube
- Common mistakes and their solutions: Why Does My Live Stream Look Blurry or Pixelated? (And How to Fix It)