Quick Answer:
A professional stream overlay is a graphic layer placed over your live video feed that displays your branding, webcam frame, alerts, and scene transitions. You do not need a designer to create one. Free tools like StreamElements, Canva, and OWN3D Pro let you customize pre-built overlay templates in a browser in under 30 minutes, with no software download or design experience required.
Seven million streamers go live on Twitch alone every month (TwitchTracker, 2025), and most of them are competing for the same viewer attention in the same crowded directories. A polished professional stream overlay does not guarantee an audience, but a visually inconsistent or bare stream is often the first reason a new viewer clicks away in under three seconds.
The problem is that custom overlay design quotes from freelancers typically run between $100 and $400 for a basic package, and that is before revisions. For most new or growing streamers, that cost makes no sense before the channel has proven itself. This guide covers every free tool, practical technique, and workflow decision you need to build an overlay that looks like you paid for it. By the end, you will know exactly how to add your overlay to any streaming setup, including browser-based platforms that skip the software download entirely.
What Exactly Is a Stream Overlay?
A stream overlay is a transparent image file (usually PNG or a browser-rendered widget) that sits on top of your live video, camera feed, and gameplay capture. It functions like a TV broadcast graphic package: it frames your webcam, displays follower alerts, shows chat, and communicates your brand identity at a glance.
Overlays are not a single file. A complete overlay package typically includes:
- A full-screen scene frame (the main "skin" around your game and webcam)
- A webcam border or frame
- Alert overlays (follower, subscriber, donation)
- Starting soon, BRB, and stream ending screens
- Chat box widget
- Scene transition animations (optional)
Treating the overlay as one deliverable is the most common beginner mistake. Thinking of it as a system of connected graphic assets makes design and customization decisions much cleaner.
Can a Free Overlay Actually Look Professional?
Here is the counterintuitive truth: the most common amateur overlay mistake is not using a free template. It is using too many elements at once.
Professional broadcast design principles do not require expensive software. They require restraint. A two-color palette, a single consistent font, and generous empty space will beat an over-cluttered custom design every time. The streamers whose overlays read as high-production are not necessarily using expensive custom work. They are using fewer elements, applied with more consistency.
That said, free templates do carry one real risk: hundreds of other streamers are using the same base design. The fix is simple: change the color palette and swap the fonts. Those two changes alone make a template effectively unrecognizable from its source. Any free browser-based design tool can handle both in under ten minutes.
🛠️ What Free Tools Can You Use to Create a Stream Overlay?
The tool landscape breaks into two categories: overlay editors (purpose-built for streaming graphics) and general graphic design tools (more flexible, slightly steeper learning curve). Here is an honest comparison of the main options:
| Tool | Free Tier Overlay Access | Browser-Based | OBS Compatible | Best For |
|---|---|---|---|---|
| StreamElements | Full free overlay editor + widget library | Yes | Yes (browser source) | Beginners who want everything in one place |
| OWN3D Pro | Free templates + overlay maker | Yes | Yes (browser source) | Streamers who want themed full packages |
| Canva | Free PNG export with overlay templates | Yes | Yes (upload as image) | Custom branding, non-gaming streamers |
| Nerd or Die | Free designs available, premium library | Partial (Streamlabs-native) | Yes | Streamlabs users wanting curated designs |
| Placeit | Limited free, subscription for full library | Yes | Yes | High-quality visual output, faster results |
| Photopea | Fully free PSD editor | Yes | Yes (via export) | Editing purchased or downloaded PSD packs |
The Honest Verdict:
Krisp works best when your mic gain is set correctly before applying it. If your gain is too low, Krisp will aggressively filter your voice as well as background noise. Set your mic level so your voice peaks between -12dB and -6dB in OBS before enabling Krisp.
📋 How to Add a Professional Stream Overlay Step by Step
This process works whether you are streaming on Twitch, YouTube, Kick, or any other platform.
Step 1: Define your color palette before opening any tool. Pick two primary colors and one accent color. Use a free palette tool like Coolors.co to generate a harmonious set. Note the hex codes. This decision takes five minutes and prevents every design choice downstream from feeling random.
Step 2: Choose your overlay tool. For most beginners, go to StreamElements and click "My Overlays" from the dashboard. You get a free overlay editor and a library of pre-built themes at no cost.
Step 3: Select a base template. Browse the "Super Themes" section on StreamElements. These are full overlay packages designed by professionals, including alerts, scene transitions, and widgets. Pick one that matches your stream's general aesthetic (dark, minimal, esports, etc.).
Step 4: Customize to your brand.
- Change all primary colors to your chosen hex codes
- Replace any placeholder fonts with one of Google Fonts' free options (Inter, Space Grotesk, and DM Sans all read cleanly at overlay sizes)
- Upload your logo or channel name as a text element
- Remove any element you do not actively plan to use (empty chat boxes and unused alert zones make overlays feel cluttered)
Step 5: Set the correct resolution. Export or configure your overlay at 1920x1080 pixels. StreamYard documents recommend static overlay images stay under 20MB; animated GIFs under 3MB. If your overlay tool exports a browser source URL (as StreamElements does), resolution handling is automatic.
Step 6: Add the overlay to your streaming setup. The method depends on your setup (see the section below for specifics).
Step 7: Test before going live. Do a private test stream or recording. Check that your webcam sits correctly inside the frame, alert overlays do not block gameplay, and all text is readable at a 1080p stream output.
🎨 What Should a Professional Stream Overlay Actually Include?
Less is almost always more. A broadcast-quality overlay typically contains:
- One clean full-screen frame that borders your game capture and webcam without blocking the center of the screen
- A webcam frame or border that clearly separates your face from the game background
- A chat box if community interaction is central to your content (many experienced streamers remove this entirely)
- An alert layer for follower/subscriber/donation notifications, set to display for no more than 5 seconds
- A "Starting Soon" scene that lets you warm up before your main content begins
What most beginner overlays include that they should not: social media icon rows, multiple progress bars running simultaneously, animated backgrounds behind the webcam, and color-shifting neon borders. Each added element dilutes the professional signal the overlay is meant to create.
💻 How Do You Add Your Overlay to OBS or a Browser-Based Platform?
In OBS Studio
OBS Studio is the most widely used free streaming software. Adding a browser-source overlay in OBS takes less than two minutes once your overlay is ready:
- In OBS, click the "+" icon in the Sources panel
- Select "Browser" from the source type list
- Paste your overlay URL (from StreamElements or OWN3D Pro) into the URL field
- Set width to 1920, height to 1080
- Check "Shutdown source when not visible" to reduce CPU usage
- Click OK. Your overlay now layers on top of your other sources
If you are using a PNG file rather than a browser source URL, choose "Image" instead of "Browser" in Step 2, and locate your exported overlay file.
In a Browser-Based Streaming Platform
If you are streaming directly from a browser without downloading any software, the overlay workflow is equally straightforward. Yostream, a browser-based live streaming and multistreaming platform, lets you go live on Twitch, YouTube, and multiple platforms simultaneously with no download required. Overlays in a browser-native setup like Yostream can be added as image layers directly within the studio interface, which eliminates the layer management complexity that trips up many OBS beginners.
This approach is particularly useful for streamers who want a clean setup without managing local software, audio routing, and overlay files across multiple applications.
Enter into the Yostream studio.

From the four options appearing at the bottom-right corner, select Brand.

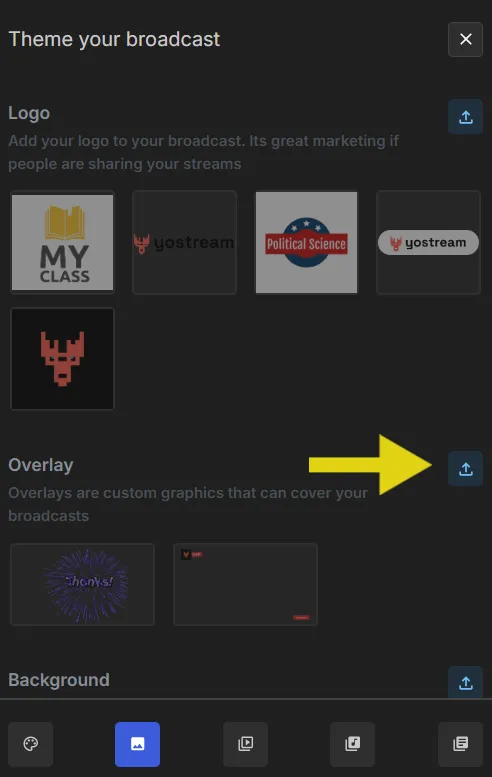
Clicking the Brand icons opens up the branding panel on the right side. You can see five icons at its bottom. Select the second in the row (Graphics), and you'll see the following panel:

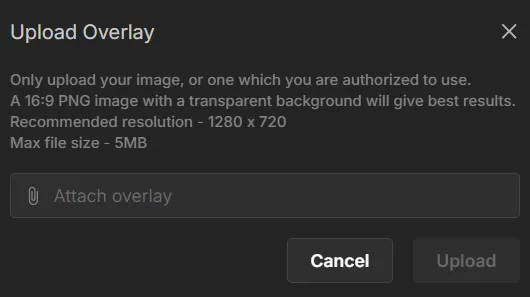
Click the upload icon in the Overlay section.
Upload your preferred overlay while ensuring the file size doesn't exceed 5MB.
💡 Pro Tips for Making a Free Overlay Look High-End
The single fastest upgrade to any free overlay is consistent font pairing. Use one display font for your channel name and one clean sans-serif for all widget text. Most free templates default to mismatched system fonts — changing these two elements makes the overlay read as intentional rather than assembled.
Three design principles that separate average overlays from sharp ones:
- White space is not wasted space. Your game is the main visual. The overlay should frame it, not fight it. Panels that extend into the game view reduce immersion and read as amateurish.
- Opacity matters. Semi-transparent overlay elements (60–80% opacity on non-essential UI) keep your layout readable without making it feel like a solid graphic is sitting on your stream.
- Animated alerts should be brief. A follower alert that plays for 8 seconds is a viewer retention problem. 3 to 4 seconds is the correct duration for most alert animations.
⚠️ Warning
Avoid using overlay assets that include embedded social media icons linked to accounts you do not actively maintain. An overlay that points viewers to a Twitter/X account with three posts from 2022 damages credibility faster than having no social links at all. Only include platforms where you are genuinely active.
🆚 Free Overlays vs. Designer-Made Overlays: When Does Paying Make Sense?
The honest answer is that a custom designer becomes worth it at a specific inflection point: when your stream has a consistent viewer base and your brand identity is clear enough that you could brief a designer precisely on what you want. Before that point, paying for custom design is like buying a professional recording studio before you have written your first ten songs.
The real cost of a bad custom overlay is not the money spent. It is the two or three redesign cycles that happen when the brief was vague, which push the actual live date back by weeks.
For channels under roughly 50 average concurrent viewers, a well-customized free template is indistinguishable from custom work to the average viewer. Invest the budget in a better microphone or a ring light. Those upgrades produce more retention than any overlay design.
Quick Answers for Busy Streamers
1. How do I add an overlay to my stream for free?
Use StreamElements or OWN3D Pro — both offer free overlay editors accessible from any browser. Log in, select a template, customize your colors and text, and copy the generated browser source URL into your streaming software (OBS, Streamlabs, or a browser-based platform). The entire process takes 20 to 30 minutes for a complete overlay package with zero cost.
2. Do I need OBS to use a stream overlay?
No. OBS Studio is the most common desktop option, but it is not required. Browser-based streaming platforms handle overlays natively within their web studio interface, so you can add overlay layers without downloading any software. Platforms like Yostream are specifically built around this no-download workflow.
3. What makes a stream overlay look professional?
Three things: visual restraint (fewer elements, more breathing room), consistent branding (one palette, one or two fonts used across every scene), and proper framing (your webcam border and scene frame should feel intentional, not arbitrarily sized). Most free overlays look unprofessional not because they are free, but because they are used as downloaded without any customization.
4. What resolution should my stream overlay be?
Design and export at 1920x1080 pixels for 1080p streams. If you stream at 720p, a 1920x1080 overlay will still scale correctly in most software. For browser source overlays from tools like StreamElements, resolution is handled automatically by the platform.
5. Can I use a Canva design as a stream overlay?
Yes. Design your overlay frame in Canva at 1920x1080 pixels, export as a PNG with a transparent background, and add it as an image source in OBS or your browser-based streaming platform. Canva's free tier supports transparent PNG export. This approach works best for static overlay frames, not animated alerts.
6. How long does it take to set up a stream overlay?
With a purpose-built overlay editor like StreamElements, a complete scene including alert overlays, a webcam frame, and a Starting Soon screen takes 30 to 60 minutes from start to live. If you are building from scratch in Canva or Photopea, budget 2 to 4 hours for a first build.
7. Should I use animated or static overlays?
Static overlays are faster to set up and create less visual noise for viewers. Animated overlays (typically WebM or GIF files) add energy but at the cost of increased CPU load during a stream that is already taxing your system. Start with a polished static overlay and add animations selectively for alert events only.
Now Go Build It
Three things will move your overlay from beginner to broadcast-quality without spending money: pick your color palette before opening any design tool, choose a free purpose-built overlay editor like StreamElements or OWN3D Pro rather than starting from a blank canvas, and remove every element from your overlay that you cannot explain a specific purpose for.
The live streaming market generates over $100 billion annually (Teleprompter.com, 2025) and viewer expectations have grown with it. A clean, intentional overlay is table stakes now, not a differentiator, but it does not require a design budget to achieve.
If You Liked This, Try These :
- Let your passion meet performance: How To Live Stream Like A Pro?
- The setting 90% of streamers ignore: The One Audio Setting That Separates Pro Streamers from Beginners
- Made for newbies, loved by pros: Best OBS Studio Alternatives for New Streamers