
You've got your avatar. You've installed the software. You hit run - and nothing moves. Or worse, your model's head slowly drifts to the ceiling while your face stays completely still. Every new VTuber hits this wall at some point, and it's almost never a hardware problem. It's a setup problem. Syncing a VTuber model with face and body tracking involves four distinct systems - avatar, tracking software, data bridge, and streaming output - and if any one of them is misconfigured, the whole thing breaks down.
This guide walks through the entire process from scratch: what syncing actually means, which tools handle which job, and exactly how to connect it all together so your avatar moves the way you do.
What Does It Mean To Sync A VTuber Model With Face & Body Tracking?
Syncing your VTuber model means creating a live data connection between your physical movements and your digital avatar so that when you turn your head, blink, or raise your arm, the avatar does the same - in real time.
Face tracking captures facial landmarks - your eyes, eyebrows, nose, mouth, and jaw - using a webcam or depth camera. That data gets mapped to corresponding parameters in your avatar's rig, so a raised eyebrow triggers the avatar's eyebrow blend shape, a wide-open mouth triggers the lip sync parameter, and so on.
Body tracking captures movement below the neck. This can range from a rough approximation using a single webcam (MediaPipe or similar) to precise full-body tracking using VR trackers attached to your hips, knees, and feet.
Synchronization is the process of taking all that movement data and feeding it into avatar software at low enough latency that the result looks natural. Latency above roughly 100 milliseconds starts to feel visibly disconnected - you'll notice expressions arriving a beat after the emotion they're supposed to represent.
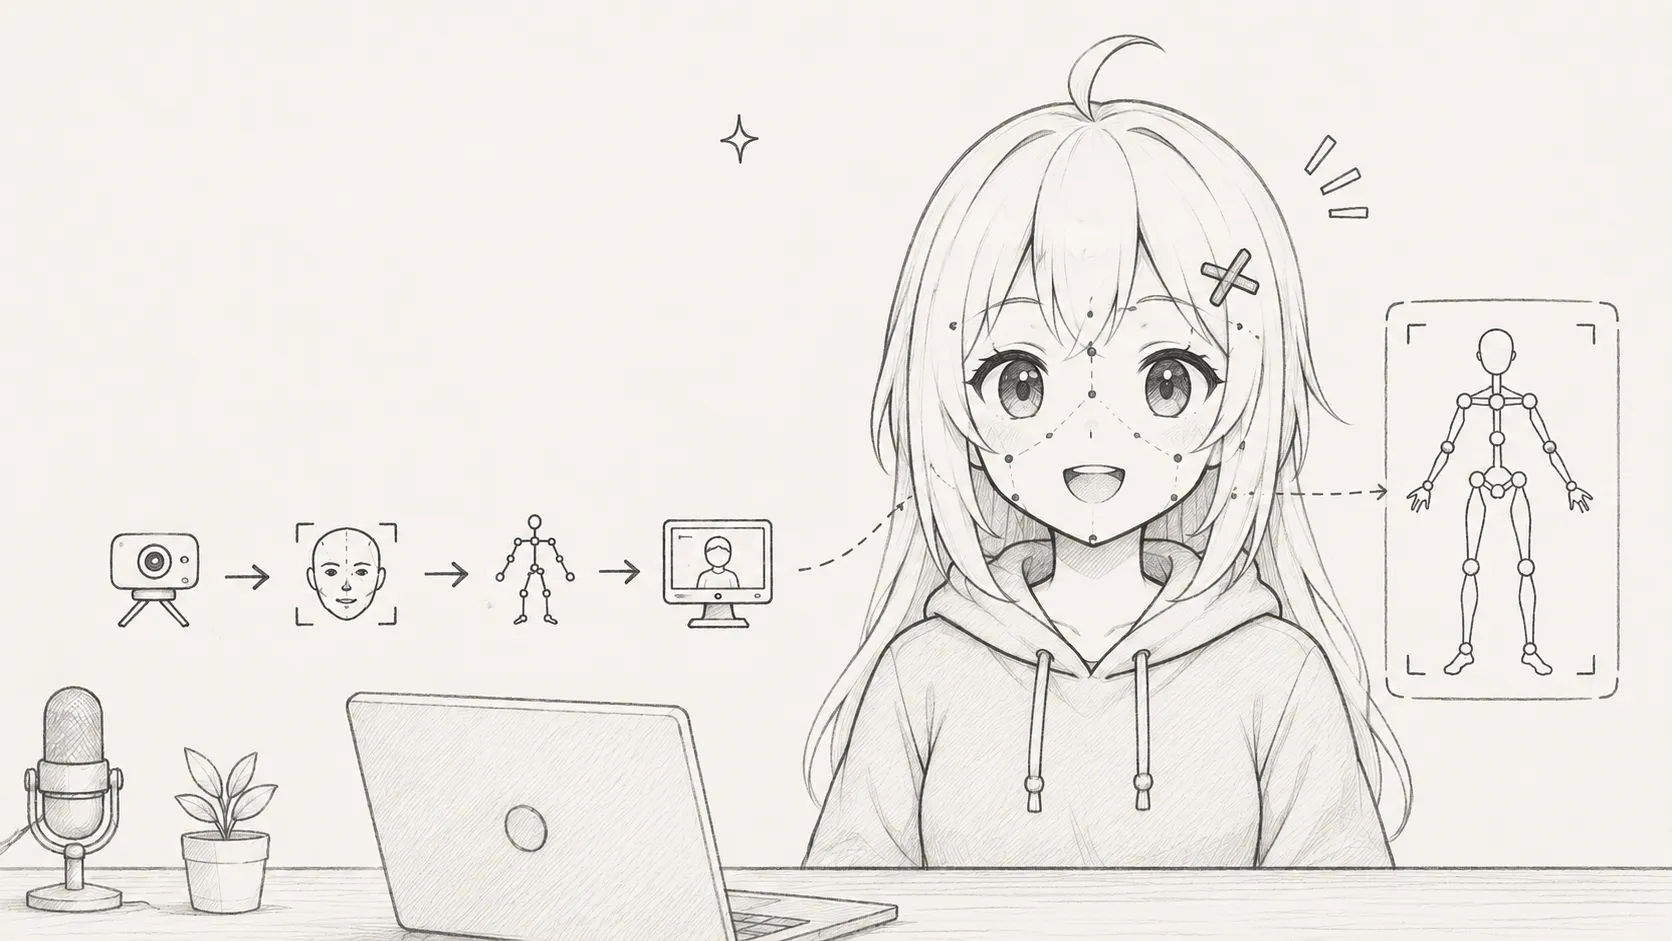
The complete sync pipeline looks like this: Camera or sensor → Tracking software → Avatar renderer → Virtual camera → Streaming software (OBS).
How Face Tracking Works In VTubing
Face tracking in VTubing is built on facial landmark detection - the process of identifying key points on your face in each video frame and calculating their positions relative to each other.
A typical model tracks 68 or more facial landmarks: corners of the mouth, edges of each eye, the tip of the nose, the outline of the jaw. Software like OpenSeeFace (which powers VSeeFace) runs this detection on every frame from your webcam, then converts the landmark positions into movement values called blendshape parameters or tracking parameters.
Those parameters map directly to your avatar's rig. If your VRoid model has a parameter calledMouthOpenY, the tracking software sends a value between 0 and 1 based on how wide your jaw is open. At 0, the mouth is closed. At 1, it's fully open. Every expression your avatar can make corresponds to one of these parameters.Eye tracking typically works the same way - the software detects your iris position within the eye socket and maps it to the avatar's eye direction parameters. Some setups use a separate eye-tracking device; most webcam setups derive eye gaze from eyelid and iris landmarks instead, which is less precise but adequate for streaming.
Head rotation (yaw, pitch, roll) is tracked by calculating the 3D position of your face relative to the camera. This is why camera placement matters so much - if the camera is off-angle, the tracking software has to extrapolate, and small errors compound into visible drift.
How Body Tracking Works In VTubing
Body tracking in VTubing breaks into two categories based on what hardware you're using: webcam-based pose estimation and physical tracker-based tracking.
Webcam body tracking uses pose estimation models (like MediaPipe's BlazePose) to detect key body joints from your camera feed. It can approximate shoulder rotation, arm position, and torso lean from a single camera without any additional hardware. The tradeoff is accuracy - webcam pose estimation works reasonably well when you're sitting relatively still, but struggles with fast movements, partially occluded limbs, and anything below mid-torso if your camera is desk-mounted.
VR tracker-based tracking uses physical devices (typically Vive Trackers or similar) attached to your body at the hip, ankles, and sometimes knees. These report precise 6DoF (six degrees of freedom) position data to a receiver connected to your PC. This approach is dramatically more accurate but requires a VR base station setup and costs several hundred dollars in additional hardware.
Partial body tracking is the most common real-world approach: face and head tracking via webcam, upper body via a second camera or webcam pose estimation, and hands left static or roughly approximated. Most viewers won't notice the difference unless you're specifically doing expressive hand gestures.
For most beginners streaming from a desk, webcam face tracking plus static or lightly animated body is the right starting point. Add body tracking later if audience feedback or your own content format demands it.
Tools Required To Sync A VTuber Model With Face & Body Tracking
| Component | Purpose | Recommended Tools |
|---|---|---|
| Avatar Creation | Build or import your 3D model | VRoid Studio, Live2D |
| Face Tracking | Detect and transmit facial movement | VSeeFace, VTube Studio |
| Body Tracking | Capture body pose data | Webcam (MediaPipe), Vive Trackers |
| Avatar Renderer | Display and animate the avatar | VSeeFace, VTube Studio, Luppet |
| Streaming Software | Capture and broadcast to platforms | OBS Studio, Yostream |
| Virtual Camera | Bridge between avatar app and OBS | Built into VSeeFace/VTube Studio |
One note on streaming software: OBS is the most common choice and what most tutorials assume. If you'd rather skip the encoder configuration entirely, Yostream is a browser-based alternative that handles multistreaming natively - no downloads, no driver conflicts. Your avatar output comes in via virtual camera just the same, but you're not managing OBS scenes on top of everything else. For a full walkthrough of that approach, this guide on how to start VTubing without OBS covers the browser streaming setup from scratch. For a new VTuber already juggling tracking software and avatar apps, fewer moving parts is genuinely worth considering.
Hardware recommendations for beginners:
- Webcam: 1080p at 30fps minimum. The Logitech C920 or C270 are common starting points. 60fps webcams improve tracking smoothness noticeably but aren't required.
- CPU: Face tracking is CPU-intensive. OpenSeeFace runs a neural network on every frame. An Intel Core i5 or Ryzen 5 from the last three years handles it at medium settings. Older or weaker CPUs will struggle to maintain 30fps tracking while streaming simultaneously. If you're planning to stream at higher resolutions or frame rates, check out the best VTuber PC specs for 4K streaming and high FPS before buying or upgrading hardware.
- RAM: 8GB minimum, 16GB strongly recommended if running VSeeFace, OBS, and a browser simultaneously.
- iPhone (optional): iPhones running iOS 14 or later support ARKit-based face tracking via apps like VTube Studio's iOS companion app. ARKit's 52 blendshapes are significantly more expressive and accurate than webcam landmark tracking. If you have a compatible iPhone, use it.
- GPU: Not required for face tracking itself, but OBS scene rendering and some avatar renderers benefit from a dedicated GPU.
How To Sync VTuber Model With Face & Body Tracking (Step-by-Step Tutorial)
Step 1: Create Or Import Your VTuber Model
Why it matters: The tracking pipeline only works if your avatar has the right parameters and blend shapes. Models without proper rigging won't respond to tracking data no matter how well the rest of the setup is configured.
What to do: If you're creating your own model, use VRoid Studio to design a character and export it as a.vrm file. VRM is the most widely supported format across VTubing tools. If you're using a commissioned or purchased model, confirm it's in VRM format (for VSeeFace) or as a Live2D .moc3 file (for VTube Studio with Live2D avatars).Import your model into your tracking software of choice and verify it loads without errors before touching any tracking settings.
Common mistake:
Trying to use a model exported from a general 3D tool (Blender, Maya) without proper VRM rigging. These will load as static objects with no blend shapes, and tracking data will have nothing to drive.
Step 2: Configure Face Tracking
Why it matters: Face tracking is the core of most VTuber setups. Getting the camera and software configured correctly here determines the quality of everything downstream.
What to do (VSeeFace):
- Launch VSeeFace and load your VRM model.
- In the startup dialog, select your webcam from the camera dropdown.
- Set the tracking quality. Start at "Medium" - "High" is more accurate but heavier on CPU.
- Position your webcam at eye level, roughly 50–70cm from your face. Eye level matters: a camera looking up at you from a desk will cause the model's head to appear to lean back constantly.
What to do (VTube Studio):
- Launch VTube Studio and import your avatar.
- Go to Settings → Face Tracking and select your camera or iPhone.
- If using an iPhone, install the VTube Studio iOS app and connect via the IP address shown in the desktop settings.
- Enable the tracking parameters you want to use. Start with the defaults.
Common mistake:
Skipping the camera angle check. Run a brief tracking test before any calibration. If the model's head is tilted or rotated when you're sitting straight, fix the camera position before trying to calibrate it away.
Step 3: Calibrate Facial Expressions
Why it matters: Calibration sets the baseline - it tells the software what your neutral face looks like so it can accurately detect deviations from that baseline. Without calibration, you'll get drifting, unresponsive expressions, or expressions that trigger when they shouldn't.
What to do:
- Sit in your normal streaming position with normal streaming lighting.
- In VSeeFace, click "Calibrate" from the main screen. Hold completely still with a relaxed, neutral expression for the 3-second countdown. Don't smile. Don't raise your eyebrows. Just your resting face.
- In VTube Studio, use the calibration button in the face tracking panel. Same principle - neutral expression, normal posture.
- After calibration, test each expression: smile, open mouth wide, close one eye, look left and right. Watch the avatar mirror each movement.
Common mistake:
Calibrating with a slightly raised eyebrow or a partial smile. This makes the neutral position read as "slightly expressive," which means your avatar will have subtle unintended expressions throughout your stream. Recalibrate whenever your lighting or sitting position changes significantly.
Step 4: Set Up Body Tracking
Why it matters: Even partial body tracking - just shoulder and upper arm movement - adds a significant amount of life to an avatar that would otherwise sit perfectly still from the neck down.
What to do (webcam body tracking in VSeeFace):
- In VSeeFace settings, enable the upper body tracking option.
- Ensure your webcam can see your shoulders and upper torso. If your webcam is mounted at face level and tight-framed, you may need to adjust its position or zoom out.
- Test by leaning left and right - the avatar's torso should follow the lean.
What to do (VR tracker setup):
- Ensure your SteamVR base stations are set up and tracking.
- Place Vive Trackers on your hips (and optionally ankles/knees).
- In VSeeFace's external tracking settings, configure VR tracker input via the VMC protocol.
- Calibrate the tracker positions by standing in a T-pose when prompted.
Common mistake:
Expecting webcam body tracking to look as smooth as VR tracking. It won't. Webcam pose estimation introduces more jitter than physical trackers. The goal is "plausible upper body movement," not motion-capture precision.
Step 5: Connect Face And Body Data
Why it matters: If you're using separate tools for face and body tracking, you need a data protocol to merge them into a single avatar output. The most common is VMC (VirtualMotionCapture) Protocol.
What to do:
- In VSeeFace, VMC protocol output is enabled by default on port 39539.
- If you're using a separate body tracking solution (like Tracking World or VMC4UE), configure it to send data to the same avatar renderer.
- In VTube Studio, VMC input can be configured under Settings → VTube Studio → VirtualMotionCapture.
- Test by moving your face and body simultaneously and watching for both tracking systems driving the avatar correctly.
Common mistake:
Running two applications that both try to own the avatar output simultaneously. This causes conflicts - one application's data overwrites the other's every frame. Designate one application as the avatar renderer and route all other tracking data into it.
Step 6: Adjust Tracking Sensitivity
Why it matters: Default sensitivity settings are designed for an average face in average conditions. Most users need to tune at least a few parameters to get natural-feeling movement.
What to do:
- In VTube Studio, open the parameter editor and check each expression parameter's min/max range.
- If your smile barely moves the avatar's mouth, increase the max value for the mouth smile parameter.
- If eye tracking looks twitchy, increase the smoothing value for eye position parameters.
- In VSeeFace, use the expression tuning sliders in the settings panel to adjust blend shape trigger thresholds.
The goal is movement that feels proportional - not so sensitive that every micro-expression fires, and not so dampened that you have to make exaggerated faces to get a response.
Common mistake:
Maxing out sensitivity to get more responsive expressions. High sensitivity amplifies noise from the tracking model, which shows up as micro-twitches and random expression flickers, especially under variable lighting.
Step 7: Test Real-Time Movement
Why it matters: Moving through a quick test covers edge cases that static calibration misses - lateral head movement, looking away from camera, speaking loudly, laughing.
What to do:
- Look directly at the camera and hold for 5 seconds. The avatar should face forward with no drift.
- Turn your head slowly left and right to the limits of comfortable movement.
- Open your mouth fully, then partially. Test lip sync by speaking a sentence.
- Blink slowly, then rapidly.
- Move your shoulders left and right if body tracking is enabled.
Watch for: expressions that fire without input, drift that accumulates over 30+ seconds, eye tracking that lags behind head movement, or body tracking that loses position when you move quickly.
Common mistake:
Only testing the avatar while sitting still and looking straight at the camera. Problems almost always show up at the edges of movement range, not the center.
Step 8: Optimize Performance And Reduce Latency
Why it matters: Running tracking software, an avatar renderer, OBS, and a browser simultaneously is a significant system load. Unmanaged, this leads to dropped frames, tracking stutters, and audio-visual desync.
What to do:
- In VSeeFace settings, lower tracking quality from High to Medium if CPU usage is above 70%.
- Close unnecessary background applications - especially browsers with video tabs open.
- In OBS, set your encoder to hardware (NVENC or AMF) rather than x264 to take encoding off the CPU. If CPU headroom is still tight, switching to a browser-based streaming tool like Yostream offloads encoding entirely - your tracking software gets the CPU budget it actually needs, and multistreaming to multiple platforms doesn't cost you extra overhead.
- In VTube Studio, reduce the rendering resolution of the avatar window if you're running at 4K and don't need it.
- Set the avatar application's process priority to High in Windows Task Manager.
- Use a dedicated GPU for OBS rendering if available.
Latency specifically:
If your avatar's expressions are noticeably behind your actual face movements, check the tracking software's framerate. VSeeFace displays current FPS in the title bar. Below 20fps tracking, latency becomes perceptible. Lowering tracking quality or closing competing CPU loads usually resolves it.
Common Tracking Problems And How To Fix Them
Most tracking problems follow predictable patterns. The table below covers the common ones with direct fixes. For issues involving model glitching, deformed meshes, or rendering artifacts specifically, this guide on how to fix tracking and rendering issues in a VTube model goes deeper on the visual side of the problem.
| Problem | Likely Cause | Fix |
|---|---|---|
| Avatar not moving at all | Tracking software not connected to avatar renderer | Check virtual camera is enabled; verify OSC/VMC port settings match |
| Face tracking works but avatar frozen | Avatar renderer receiving no data | Restart VSeeFace/VTube Studio; reselect the model |
| Expressions not syncing | Blend shape names don't match parameter names | Check model's blend shapes in VRoid; confirm VTube Studio parameter mapping |
| Head drifting over time | No recalibration after setup shift or lighting change | Recalibrate; move camera to eye level |
| Webcam not detected | Driver issue or another app using the camera | Close other apps using the camera; reinstall webcam drivers |
| Poor body tracking accuracy | Webcam too narrow/far; poor lighting | Lower camera, widen frame; improve room lighting |
| High CPU usage / stuttering | Too many processes competing; tracking quality too high | Lower tracking quality; close background apps; switch OBS to hardware encoding |
| Laggy avatar movement | Tracking FPS too low | Reduce tracking quality; free up CPU; check for thermal throttling on laptop |
| One eye not tracking | Face partially outside camera frame | Center yourself in camera view; adjust zoom |
| Mouth not syncing to voice | Mic not set as audio input for lip sync | In VTube Studio: Settings → Face Tracking → Lip Sync → select correct microphone |
Best Practices For Smooth And Accurate Tracking
Lighting is the single biggest variable most beginners underestimate. Webcam face tracking relies on consistent illumination of your facial landmarks. Backlighting (a window behind you), harsh top-down lighting, or lighting that creates strong shadows under your eyes and nose all degrade tracking quality regardless of your software settings.
The most reliable setup is a ring light or softbox placed slightly above eye level, directly in front of your face. This fills your face with even, diffuse light that makes landmark detection much more consistent. Avoid colored lights for tracking purposes - RGB setups look great on stream but confuse skin tone detection.
Camera placement follows one rule: eye level, centered. Not chin level (causes neck strain in the avatar), not above you (causes head to lean back), not off to the side (introduces persistent roll in tracking data). Mount your webcam at the top of your monitor or on a small tripod at desk level.
Calibrate every session. It takes 5 seconds and it matters. Your sitting position, your lighting, and even the ambient light from a window changes day to day. Tracking software calibrated at noon in sunlight will behave differently at 9pm with lamps on.
Frame rate consistency matters more than raw frame rate. Tracking at a steady 25fps produces smoother avatar movement than tracking that oscillates between 35fps and 15fps. If your system can't hold a consistent high rate, lock tracking to a lower consistent rate in settings.
Test in the same room and lighting you'll stream in. Setups that work perfectly in daylight sometimes fall apart at night under artificial lighting. Run at least one 10-minute test at your actual planned streaming time before your first public broadcast.
Face Tracking Vs Full-Body Tracking
| Factor | Face Tracking Only | Full-Body Tracking |
|---|---|---|
| Cost | ~$30–80 (webcam) | $200–600+ (VR trackers + base stations) |
| Accuracy | Good for expressions; moderate for head rotation | High for body; excellent with VR hardware |
| Hardware needed | Webcam, mid-range CPU | Webcam + VR trackers + SteamVR-compatible PC |
| Setup complexity | Low - 30–60 minutes for beginners | High - hours for first setup |
| Latency | Low with good hardware | Low to moderate depending on protocol |
| Beginner-friendly | Yes | No |
| Movement range | Head and face only | Full upper/lower body possible |
| CPU impact | Moderate (OpenSeeFace, VSeeFace) | High - multiple tracking processes |
| iPhone alternative | Yes - ARKit replaces webcam, much higher accuracy | No direct equivalent |
| Audience perception | Most viewers won't notice the absence of body tracking | Noticeably more dynamic; matters for dance/movement content |
For content focused on talking, gaming, or commentary, face tracking alone is sufficient. Full-body tracking becomes worth the investment if your content involves movement - dancing, exercise streams, theatrical performances.
Mistakes New VTubers Make When Syncing Tracking
Skipping calibration entirely. This is the most common one. The software has defaults that are close to neutral, and new users assume that's good enough. It isn't. A 3-second calibration step produces meaningfully better results than no calibration.
Treating tracking drift as unfixable. Drift - the gradual offset of the avatar's position from your actual face position - is almost always caused by two things: a camera positioned off-angle, or calibration done in different lighting than the current session. Move the camera. Recalibrate. Drift is a symptom, not a permanent condition.
Setting up the most complex configuration first. New VTubers see full-body tracking setups, VR trackers, multiple cameras, and external hardware and assume that's what they need from day one. Start with a single webcam and VSeeFace or VTube Studio. Get face tracking working smoothly. Add body tracking only when that baseline is solid.
Placing the webcam at laptop height. Laptop users commonly prop their machine on a desk and position themselves above the webcam angle. The tracking software reads your chin instead of your eyes as the reference point, the avatar's head tilts back, and calibration can't fully compensate for it. Use an external webcam at eye level.
Expecting webcam body tracking to look polished on the first try. Webcam pose estimation isn't magic. It works well for slow, deliberate movements when well-lit and properly framed. Fast movements, poor lighting, and tight framing all produce jittery or incorrect body positions. If body tracking is making your stream look worse than no body tracking, turn it off and use a neutral idle animation instead.
Ignoring CPU load until they're live. A machine that handles tracking and preview in OBS Studio fine during a local test can start dropping frames when platform encoding is also active. Always do a full test run with everything active - tracking, OBS, the platform connection, and any browser sources - before your first real stream.
Test Your Tracking Before Going Live
Run through this checklist before every stream, especially before your first public broadcast. Five minutes of testing prevents the experience of discovering problems in front of an audience.
☑ Facial expressions respond correctly - smile, open mouth, blink
☑ Eye tracking moves naturally when looking around
☑ Head movements are smooth with no visible lag
☑ Body tracking is stable at the range of motion you'll use on stream
☑ Lip sync is accurate when speaking at your normal streaming volume
☑ Lighting is consistent and the webcam image is clear
☑ CPU and GPU usage are stable under 80% with all applications running
☑ A 5-minute test recording has been reviewed in playback
☑ Calibration was done in current lighting conditions
☑ OBS virtual camera is receiving the avatar output correctly
Do a short test stream before your debut or after any major setup change. Record it locally, watch it back at 1x speed, and look specifically at the moments when your expressions change - that's where sync issues are most visible. What feels imperceptible during the stream often becomes obvious on playback. Once your tracking passes this checklist, you can go live directly through Yostream - your avatar's virtual camera feeds straight in, and you're broadcasting to every platform without touching an encoder config.
Frequently Asked Questions
1. Can I use VTuber face tracking on a phone instead of a webcam?
Yes. iPhones with Face ID hardware (iPhone X and later) support ARKit-based face tracking via the VTube Studio iOS app. ARKit tracks 52 facial blendshapes using the depth sensor, which is significantly more accurate than standard webcam landmark detection. Android devices aren't currently supported for the same hardware-level face tracking. If you have an eligible iPhone, it's worth using over a budget webcam.
2. How much tracking latency is acceptable before it looks bad on stream?
Most viewers don't notice latency below 80–100 milliseconds. At 150ms, expressions feel slightly disconnected from the emotion. Above 200ms, the delay is clearly visible, especially during rapid expressions or speech. Reduce latency by lowering tracking quality, freeing CPU resources, and ensuring the tracking software runs at 25fps or higher.
3. Does tracking work without a dedicated GPU?
Yes. Face tracking in VSeeFace and VTube Studio runs entirely on the CPU via OpenSeeFace or similar. A GPU is helpful for OBS encoding and avatar rendering in high-resolution setups, but it's not a hard requirement. Integrated graphics can handle the avatar rendering for most VRM models at 1080p.
4. Can I use two cameras - one for face and one for body?
Yes, and this is a common intermediate setup. Assign one camera to face tracking in VSeeFace and a second camera as the body tracking source for webcam pose estimation. You'll need software that supports dual-camera input, or route each camera through a separate application and merge the data via VMC protocol.
5. Why does my avatar's mouth move even when I'm not speaking?
This usually means the lip sync is picking up ambient noise - fan noise, keyboard clicks, or a microphone with high gain. In VTube Studio, adjust the lip sync sensitivity threshold so it only triggers above a certain audio level. You can also add a noise gate to your microphone in the operating system or audio interface settings.
6. How do I stop my avatar from twitching and making micro-expressions I'm not doing?
Increase the smoothing value for the problematic parameters. In VTube Studio, most parameters have a smoothing slider - higher values average out noise over more frames, reducing twitchy behavior. The tradeoff is slightly reduced responsiveness. A smoothing value around 20–30% is a good middle ground for most setups.
7. Is full-body tracking worth it for a seated streaming setup?
For seated content - gaming, commentary, art streams - the visible benefit of full-body tracking is modest. Your legs aren't in frame and your lower body movements are minimal. The most meaningful upgrade for a seated setup is switching from webcam tracking to iPhone ARKit face tracking, which adds dramatically more expressive facial fidelity at much lower cost than VR hardware.
8. What's the difference between VSeeFace and VTube Studio for tracking?
VSeeFace is primarily designed for VRM (3D) models and runs OpenSeeFace for webcam-based face tracking. It's free, highly configurable, and popular with creators using VRoid-based avatars. VTube Studio supports both Live2D (2D) and VRM (3D) models, has a more polished interface, integrates with Twitch and YouTube directly, and supports iPhone ARKit tracking via its companion app. For Live2D models, VTube Studio is the standard choice. For VRM with maximum configurability, VSeeFace is preferred.
9. Does VTuber tracking work on a laptop?
It works, but with caveats. Laptops often have weaker CPUs that thermal-throttle under sustained load, which degrades tracking quality and frame rate over a long stream. The built-in webcam is typically positioned below eye level, which hurts tracking accuracy. If you're streaming from a laptop, invest in a USB webcam positioned at eye level and monitor CPU temperature - sustained temps above 90°C will cause throttling within 30 minutes.
10. What's the easiest streaming software for a VTuber just starting out?
If you're already managing tracking software, an avatar renderer, and a virtual camera setup, adding OBS configuration on top can feel like a lot. Yostream is worth looking at - it's browser-based, so there's nothing to install or configure at the encoder level. Your avatar's virtual camera output feeds in like any other source, and multistreaming to Twitch, YouTube, and other platforms is built in from the start. For a new VTuber whose mental bandwidth is already consumed by getting tracking right, the simpler the streaming layer the better.
11. Can I use a PS5 camera or other console camera for VTuber tracking?
The PS5 HD Camera requires a USB adapter (available from Sony) to connect to a PC, and driver support varies. It works for basic streaming but isn't designed for facial tracking workflows. Standard USB webcams with native PC drivers (Logitech, Razer, Elgato) are more reliably compatible with tracking software. If you're specifically investing in tracking hardware, an iPhone is a more effective choice than any webcam at any price point.
Streamers Also Liked:
- Find the platform that fits your style: Kick vs Twitch vs YouTube: Which Streaming Platform Should You Start On First?
- The real fix for OBS freezing: How to Fix OBS Freezing During Live Stream
- Know the trick: How to Stream Games in 4K Without Frame Drops: The No-Lag Setup Guide for 2026